
 Learning how to build a fireplace surround for a gas fireplace is not that difficult, and you can easily turn your gas fireplace into a beautiful centerpiece for your home. Since this is a project you can take care of yourself in just a day or two, you can get started today!
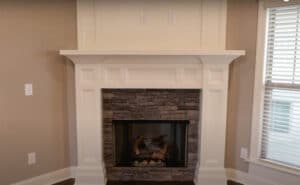
What exactly is a fireplace surround and why do you need one for a gas fireplace? Think of the surround as the mantel and everything else that surrounds your gas fireplace insert. It adds coziness to your room and is where you can put your personal touch on how your fireplace will look.
Without the fireplace surround, you just have a gas insert in the middle of the room. It might function, but it won’t look or feel like a fireplace. Read on to learn about how to create the perfect ambience around your fireplace!
What you will need to follow this tutorial
It’s a good idea to gather all your necessary tools before you get started on any project. Take a look at all that you will need on hand to get started building your fireplace surround.
Materials
What are you making your fireplace surround out of? You can use something like marble, wood, metal, or stone. You will need to have on hand the materials that will make up your new surround.
Tools
You’ll want the following tools on hand:
- Two posts
- ¾” medium-density fiberboard (MDF)
- Screw gun and screws
- Level
- Tape measure
- Paint and painting tools
- Shims
- Caulk and caulk gun
- Crown molding
- Nailer and nails
- Compressor
- Saws (table and miter)
- Power drill
- Hammer
- Sandpaper
Step by step instructions
Follow these instructions to get started building your fireplace surround:
Build Side Columns
 Construct two rectangular boxes with open backs that can serve as the support system for the fireplace surround. Then, you’ll want to lay a newel post on the front of one box and opposite on the other. These boxes are the foundation for the columns that hold up your new mantel.
Sand Edges and Seal Gaps
This step is pretty straight forward. You want to sand everything down and seal the gaps, creating a smooth and even surface — you want everything as smooth as possible. If you don’t get it smooth enough, your project will always look unfinished.
Put the Columns in Position
Cut two pieces of the MDF into cleats that can hold the columns up against the wall. Secure the columns to the cleats using nails. These columns are what holds up your mantel and keeps it upright. Make sure you get your measurements right, and you have the right amount of space for your mantel.
Create a New Mantel
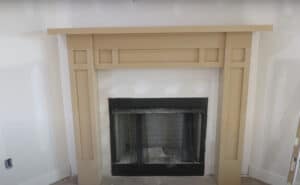 Using that MDF, you’ll want to create your new mantel. It should be bigger than any existing mantel you might have so you’ll be able to install crown molding without much difficulty. Creating the mantel is what gives your fireplace life. Take our time in picking out exactly how you want your mantel to look, so you end up with the fireplace of your dreams.
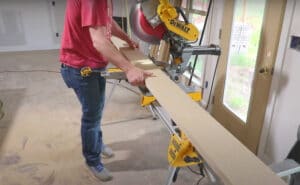
Install Crown Molding
Once the mantel is up, go ahead and install the crown molding, as that is going to pull everything together and bring you a great looking mantel. After you get it measured, you can nail it and caulk it. Sanding it will finish it off. After it’s sanded, you’re ready to paint your mantel and put on the finishing touches on!
FAQ
What if I don’t have all the tools needed?
It is important to make sure you have all the right tools before you start this job. If you don’t own them, reach out to your local hardware store, as you might be able to rent some of the bigger tools that you will only use once or twice.
Can I build a fireplace surround over an existing mantel?
You can actually build a mantel over an existing brick fireplace. You will have to follow a few more steps and it will be a little more challenging, but it can be done. Make sure you measure bigger and wider so you can accommodate for the mantel underneath.
Do I have to use crown molding?
No, crown molding is a nice touch and will make your mantel look top-of-the-line. But, you can just use plainly finished wood, sand it well and give it a fresh coat of paint. Consider what materials and look you have in the rest of your room and match the fireplace accordingly.
How much will this project cost me?
Not that much if you do it yourself. You can most of the materials for under a couple hundred bucks, and you will save money on labor since you are doing it yourself. This is truly a cheaper DIY project that can really help improve your home without much money.
What type of sandpaper do I need?
Start with a heavier grit sandpaper to knock off the heavier splinters. Finish it off with fine sandpaper to give your mantel a smooth finish. You want the mantel to have no visible splinters or bubbles when you are done sanding.
Conclusion
You should now be ready to go out and get started building your fireplace surround for your gas fireplace. Did you get everything you needed out of this tutorial? Building a fireplace surround is definitely something that most DIYers can take care of in a weekend.
Following these steps and this list should get you started on the right foot and you will soon have a mantel and a centerpiece you love. Let us know if we left anything out of the list, and please drop us some comments and let us know how your project goes! If you found the article helpful, share it on social media.
How close to combustible material can a vent free propane insert be? I am building my surround out of cherry. Do I need to install nonflammable material around the insert?